USING THE SCROLL WHEEL DEVICE WITH THE 904 INTERFACE
The scroll wheel will enumerate as a keyboard, sending these outputs:| Movement | Keycode |
|---|---|
| Upward rotations | t |
| Wheel presses | g |
| Downward rotations | b |
These codes were chosen as three keys in a vertical row on most keyboards, to make testing and scripting easy without a scroll wheel device.
SETUP
These are the basic steps to get started:- Connect the optics first
- Connect the handheld device, either to the removable bundle or directly to the interface unit.
- Connect the removable bundle if you intend to use it
- Connect the USB cable after the optics are all connected
- Test that it works
- Make sure you get the expected output (by, for example, watching the output in a text editor)
CALIBRATION
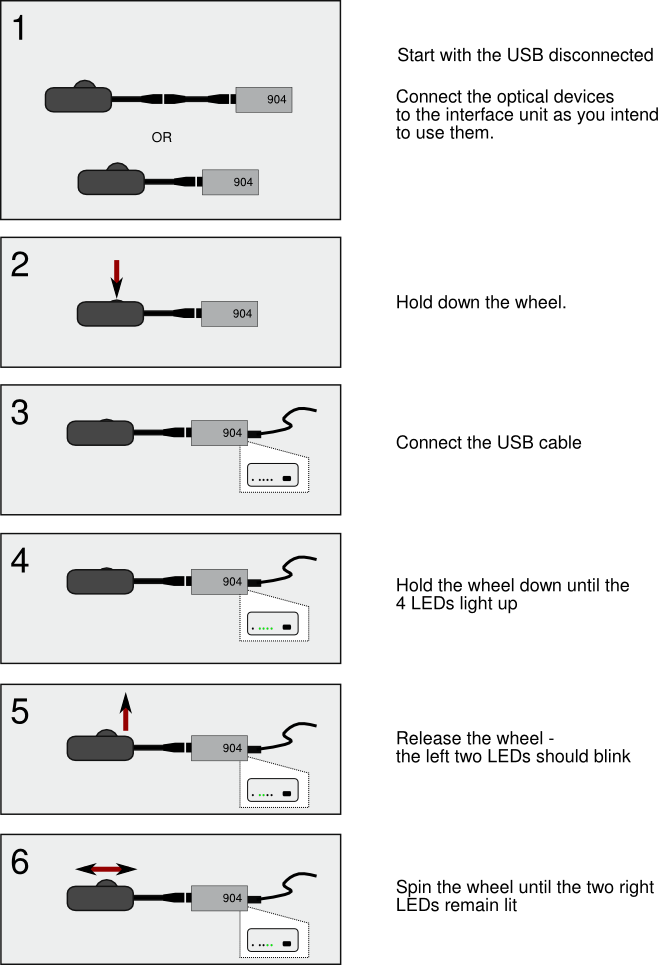
If you do not get the expected output, its probably time to re-calibrate the device.In this context "calibration" refers to setting the optoelectronic gains correctly for the combination of connected devices. This can change if, for instance, the devices were setup to work with the long bundle connected, but now the long bundle has been removed from the system. Calibrating is easy to do, though.
STEPS
 Download a pdf of this for printing here.
 ISSUES
You may find that the wheel has to be rotated back and forth with large excursions to get the two right LEDs to light, or you may find that it works better to rotate in one direction and cover more than a single wheel rotation.
Once the right two lights are lit, the settings are saved internally and will be in place permanently until another calibration is performed. If you performed the calibration without a bundle, you will find that it does not work correctly with a bundle connected. This is normal: the calibration should be performed with the devices connected in the configuration which you intend to use.
Always test the output after you calibrate before, for example, beginning a study.
| I |
Attachment | Action | Size | Date | Who | Comment |
|---|---|---|---|---|---|---|
| |
scrl_cal1.pdf | manage | 11 K | 12 Sep 2019 - 18:21 | BenDugan | |
| |
scrl_cal1.png | manage | 71 K | 12 Sep 2019 - 18:16 | BenDugan |
 Copyright © by the contributing authors. All material on this collaboration platform is the property of the contributing authors.
 Ideas, requests, problems regarding Foswiki? Send feedback

